Distressed Stickles Technique
by Roni Johnson
Today I wanted to share a technique I started playing with way back in April 2010.
Originally I had used Aleene's Thick Tacky Glue combined with Distress Ink to come up with Distress Glue Technique.
I thought it might also work by substituting Stickles Glitter Glue in place of the glue and give it a bit of sparkle at the same time.
As luck would have it, it worked perfectly.
Supplies:
Stickles Glitter Glue
Cardstock
Distress Ink
Ink Blending Tool
Instructions:
1. Begin by squeezing a dab of the Stickles onto your finger tip.
2. Lightly spread the Stickles over the cardstock. You don't want solid coverage, just steaks of the Stickles here and there.
3. Continue spreading the Stickle over cardstock until the entire piece has been covered. For this example I used Lime along the bottom 1/3rd, Waterfall in the top 2/3's with a few dots of Frosted Lace dotted here and there.
4. Now comes the hard part.... You have to let the Stickles dry completely. I don't it doesn't sound like much but I'm always excited to get to the next step to see what's hidden on the paper. If you're like me you may need to pull out your heat tool to speed the drying process.
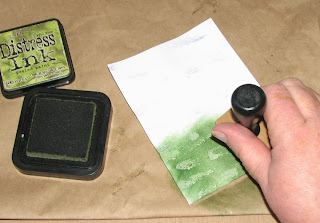
5. After the Stickles have finally dried it's time to see what you've got. Use the Ink Blending Tool to apply desired color of Distress Ink over the cardstock. I started off by using Peeled Paint along the bottom.
If I would have used a darker ink such as Chipped Sapphire, Gathered Twigs, Aged Mahogany, etc. it might have made it harder to see the Stickled areas. In that case all you would do is to take a damp cloth and wipe away the excess ink from the Stickled areas.
And here is what my finished card looks like....
(All Stamps: Just For Fun Rubber Stamps)
Distress Stickles Variation I
1. For a variation on the original technique you can apply one or more lighter colored inks to the cardstock prior to adding the Stickles. Once the Stickles have been applied over these foundation inks they will show through the Stickles after the final step.
In this example I used Chipped Sapphire for the final layer of ink. You can see how the Stickles are harder to see at the top of the tag and after cleaning how well they show up (along the bottom).
The cleaned up tag....
And my finished tag....
Distressed Stickles Variation II
For this example I initially applied Old Paper Distress Ink to the cardstock. I then applied Cinnamon Stickles over the entire panel. For the cover-up - reveal layer of ink I applied several colors of Distress Ink - Rusty Hinge, Spiced Marmalade, Gathered Twigs, and Tea Dye.
You can see how some of the inks highlight the Stickles more than others.
And my finished card...
I hope you have enjoyed this unique way to incorporate Stickles into your art!
~Roni


Great techniques. Thanks for sharing.
ReplyDeleteFantastic tutorial, Roni! I love the look!
ReplyDeleteOutstanding, Roni. great tutorial!
ReplyDeleteThis is such a fabulous technique!! I love the projects you have created. I don't own too many "Distress Stickles", wonder how this would work with regular stickles? I am going to have to give it a try.
ReplyDeleteVery cool idea!!Love how they all turned out!
ReplyDeleteCool idea! TFS!!
ReplyDeleteWOW!Awesome work!Thank you for tutorial,Have a good weekend!
ReplyDelete