Button photo DTC.png  photo DT.png Button Button Button Button Button
Button

Saturday, November 30, 2013

November Linky Party Winners!

Hey everyone! Our Holiday Home Decor Linky Party is still in full swing, but in the meantime we'd like to announce our November winners! A big thanks to everyone who played along this month!

$25 Gift Certificate
WINNER: PAM L.

2 Digital Stamps of Winner's Choice
WINNER: DEANNE

$25 Gift Certificate
WINNER: GEORGIANA

2 Itty Bitty Stamps
WINNER: TAMMY A.

Winners: Please email us at allthatstickles@gmail.com with subject line "NOVEMBER WINNER" to claim your prize. :)

Tuesday, November 26, 2013

Tips and Techniques Tuesday: Christmas Ornament


Hi everyone, Sonia from SKdesigns here today to show you step by step how to make a Chrismas ornament using your old jeans and the difference it makes when you use STICKLES to embellish it.  It was something that came to my mind in a minute and I also did it very quickly... It is super easy... hope you like it!

Start by cutting the Jean (double sided) and "pin"
the shape you want.

Stitch around in zig zag, leaving one side open

See the side open?  

Take the pattern off and cut with scissors all around
it, leaving a bit of edge (for looks)

Use some kind of stuffing to fill it in and make it puffy

Close the open end 

Sew a piece of ribbon in a loop to be able to hang it

Add embellishments and voila!... 
a quick and easy, funky country looking 
ornament made with Jeans !!!
For this particular ornament, I used Platinum Stickles

Thanks for stopping by and have a wonderful day!

Monday, November 25, 2013

Holiday Home Decor and Mixed Media


Mixed Media is perfect for home decor and this is a great season to be inspired and to find materials in all the stores for our projects.  Personally, I love collecting vintage looking santas in all forms of media. I fell in love with an oil painting in a local gallery of an amazing Santa, however it was out of reach for my wallet!  So I decided to make a much smaller and less expensive version with some Christmas wrapping supplies from the Dollar store, and Stickles!


This is actually a gift box that I merely embellished with some Christmas Red and Gold Stickles.  I in ten to prop this on an easel and display it on my buffet in my entry way when we get up our decorations next weekend.  It was a super easy and cheap project, but I love the look so I had to share this with all of you this week as my Mixed Media Monday piece.  I was going to add some white flower soft or flocking to the white fur on this Santa, but I thought the Stickles were enough.

I hope that you are inspired to make some Holiday Home Decor with Stickles and inexpensive supplies.
Thanks for stopping by and check out my blog:  Annmakes.

Saturday, November 23, 2013

Holiday Home Decor Linky Party!

Welcome to another Linky Party at All that Stickles! 

Every month we will have multiple sponsors and multiple winners for our linky parties! Winners are not announced on a weekly basis, but rather on a monthly basis. The more times you link up, the more chances you have to win! Sponsors will be announced at the beginning of the month and then posted on the sidebar for the rest of the month, and the winners will be announced on the last Saturday of the next month.

*Our November winners will be announced next Saturday, November 30th**

Linky Party Rules & Guidelines
  • Appreciation linky party is open from Saturday November 23rd - Friday December 6th at 11:00 PM US CST
  • Any project you submit must be linked to your blog or online gallery.
  • Projects must be NEW, no backlinking, please.
  • Number of entries per linky party is unlimited.
  • You may link up ANY type of crafty project as long as it follows our theme
  • You may use as many colors of Stickles as you'd like on your projects
  • Winners will be randomly chosen.

This week's linky party theme is Holiday Home Decor! Create any holiday home decoration using Stickles!

And without further ado, here's some inspiration from the design team to get those glittery gears turning!

Stickles Used: Champagne


Stickles Used: Holly

Stickles Used: Golden Rod, Christmas Red


Stickles Used: Platinum

Stickles Used: Eucalyptus, Xmas Red, Diamond, Crystal, Frosted Lace, Icicle, Rock Candy

We can't wait to see what you create! Thanks for linking up!

Friday, November 22, 2013

Featured Fan Friday: Robin

.
Hey everyone! Today our Featured Fan is Robin from Cut One Designs by Robin!

I needed a gift bag for my Prayer Partner at Church (shhhh... if you know her don't tell her)
Anyways here is what I came up with!


I used a file from KaDoodle Bug Designs for my printed turkey tag.
And the Indian is a file from Too Cute By Jessica called:

Here is a closer view 


I stickled up the feather on the Indian with 
Christmas Red
The Indian face is of course Peachy Keen!
PK-490 Everyday Character

Thanks for stopping by!

Wednesday, November 20, 2013

Black Diamond Deals Blog Hop Winners


Thanks to everyone who hopped with us!


Here are the winners from the hop:

$15 Gift Certificate
WINNER: VALERIE
7 Digital Stamps of Winner's Choice
WINNER: SHARLA

3 Digital Stamps of Winner's Choice
(If you email TSC letting them know you're hopping with us, you'll receive a free image!)

2 Digital Stamps of Winner's Choice
WINNER: CARMEN

Congrats! Winners should email us at allthatstickles@gmail.com with subject line "NOVEMBER HOP WINNER" to claim their prizes.

Pile Up Wednesday: Thank You Cards


Hello Stickles Lovers! Welcome to Wednesday!!!! Cathy here from the ATS Design Team bringing you another Pile Up Wednesday. Today I have two Thank You cards to share. I used the same basic materials and colors and used two different application techniques of Stickles. Here's a side by side of the cards. You can see I used a basic masking technique to create the border of leaves and then stamped the sentiment. Just click on the pictures to see a larger image for the details.

The inks and stamps are from Stampin' Up (ink: Cherry Cobbler, Crushed Curry, Soft Suede; stamps: Magnificent Maple and Sassy Salutations).

In the first card, I used Distress Stickles to accent the leaves (Fired Brick, Scattered Straw, and Frayed Burlap).
Here's a close up of the leaves. Since Distress Stickles are thicker than the standard, I scribbled a few lines on top of the leaves and used the tip of the bottle to spread out the liquid. When it dried, you get the look below. 

The second card I used Standard Stickles (Burgundy, Yellow, and Cinnamon).
The standard Stickles have a finer tip so I was able to draw a fairly accurate outline along the lines in the image. Once dried, the glitter is shinier than the Distressed versions.

Here's a side by side of the close ups so you can see how you can get a different effect from using different application techniques and styles of Stickles. The Distressed version is on top, the Standard version on the bottom.

This was really a mini pile up since I only used 3 different colors of Stickles on each card, but I did use a LOT of Stickles on the cards. I hope I inspired you and that you will join my Stickles Pile Up movement and share your creation. 

There's still time to play in our Let's Talk Turkey Linky Party. Come join the party!

Thanks for coming to the Pile Up! I'll see you with another creation in a fort night.

~ Cathy, ATS Design Team

Monday, November 18, 2013

Tips and Techniques Tuesday: Stickles on Acetate

HI ALL CATHIE HERE
WITH A SHORT TUTORIAL
ON HOW YOU CAN USE YOUR STICKLES
ON ACETATE AND MAKE SOME 
COOL CLEAR TAGS OR HOWEVER YOU DECIDED TO USE
THEM
FIRST YOU NEED YOUR
STCIKLES
ACETATE SHEETS
(I GOT MINE AT OFFICE DEPOT)
BOX OF 100 I THINK WAS LIKE 25.00 BUT 
THEY WILL LAST YOU FOREVER
DESIGN YOU WANT TO TRACE
I FOUND SIMPLER DESIGNS ARE THE BEST
NOTHING WITH ALLOT OF TINY DETAILS AND LINES
LAY YOUR ACETATE OVER YOUR PRINTED
DESIGNS

BEGIN TRACE YOUR DESIGN WITH THE STICKELS
YOU CAN LEAVE IT AS AN OUTLINE LIKE ABOVE
OR YOU CAN FILL IT IN LIKE THIS


I CHOSE NOT TO SO THE TINY CIRCLES

NOW LET SIT OVER NIGHT AT LEAST TO DRY

**** NOW I THINK IF YOU DID A THICK ENOUGH
COAT THESE COULD BE PEALED UP AND MADE INTO A 
WINDOW CLING***
I HAVE NOT TRIED THIS YET


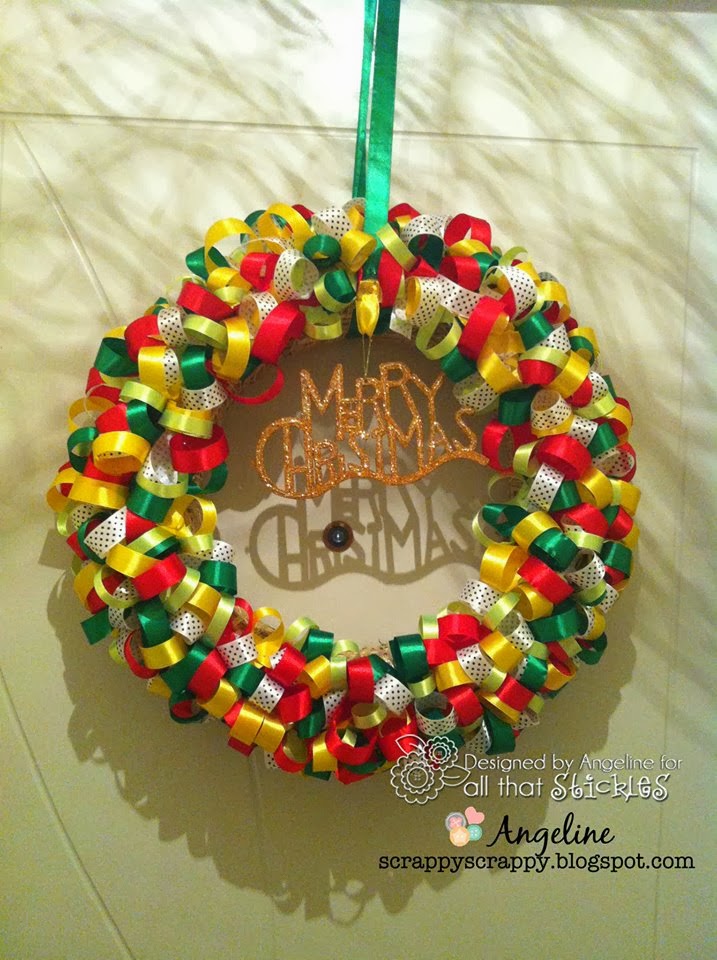
ALSO TIRED IT THIS WAY WITH WORDS
THIS IS WHAT I ENDED WITH COOL
LITTLE TAGS
THAT COULD BE VERY PERSONALIZED


I JUST CUT AROUND THE SHAPE AND THEN PUNCHED A SMALL
HOLE TO ADD RIBBON TOO


FUN TAGS!!!

BUT WITH SOME PLANNING YOU COULD VERY WELL DO THIS 
AS AN OVERLAY FOR A CARD OR PIC ETC ETC.

THANKS FOR STOPPING BY
CATHIE


Mixed Media Monday and Let's Talk Turkey

Hi, Ann here, (from Annmakes)  welcome to Mixed Media Monday.  If you are here and want to hop along our blog hop you can start here. Or stick around and check out what I have for you today, or do both!


I made a 12" x 12" scrapbook page with the pictures taken during my family's Canadian Thanksgiving, a few weeks ago.  We prepared lots of yummy foods, from scratch, and ate lots of it that day!  It was yummy….


We are all thankful to be together and for the rich lives that we live.  We are also grateful that we are able to eat too much!  That is why I made the title "Thank Full."

I used some scrapbook pears that I have had in my stash for a while as well as American Crafts card stock, Creative Memories letters and numbers stickers, a Creative Memories scrapbook page, and Ranger's Stickles in Paprika and Lime Green.  I used the stickles on the funny little turkeys I fussy cut out of some Thanks going scrapbook paper scraps.  I decorated  the tail feathers with the Stickles.

It is fun to use multiple supplies in scrapbooking and so I justify that as a form of Mixed Media.
I hope that this inspires you to record your open Thanksgiving memories.  Thank you for stopping by.