Button photo DTC.png  photo DT.png Button Button Button Button Button
Button
Showing posts with label Stickles. Show all posts

Tuesday, December 3, 2013

Tips & Techniques Tuesday: Fireworks Stickles


Hi. It's Angeline from ScrappyScrappy. Today I have a "fiery" tip for you for the upcoming New Year or any celebrations at all. :) Get those Stickles out and Stickle away!

***

1. Get your favorite Distress Paint out {Mustard Seed / Picked Raspberry / Salty Ocean}. 
Grab your water mister out and spritz some onto the top of the Distress Paint dauber.


2. Splat onto your cardstock to create a splat effect!


3. Then get your favorite Stickles out. {Glam Pink / Broken China / Yellow}


4. Stickle along the splat lines.


5. Ta-daaa!! And you have fireworks Stickles. :) 
I've stamped the sentiment below using some Unity Stamps.


Here's a close up on how pretty the fireworks is with some Stickles.


Hope you enjoy the tutorial. Go try it out and have fun Stickle-ing!

-Angeline

Tuesday, October 8, 2013

Halloween and Stickles


Hello, it's Ann from Annmakes and today I am sharing with you some ideas on how to use Stickles in your Halloween crafty projects.  I love Halloween as I get to play and have the perfect excuse to eat candy, especially those little chocolate bars, yummy!    As you may remember I LOVE Stickles and I have played with them for years!  When, it comes to Halloween projects there seems to be no limit as to which colours and types of Stickles I can use.  I have a preference for the Distress Stickles and I also like to use a lot of Black Diamond in many of my projects.  You can use those stickles on just about anything, even your pumpkins!  Just remmber that if you enjoy putting stickles on any thing that will be outside you may want to give it a sealant coat after the stickles have dried thoroughly to make sure they stay on.


I already said that there are no rules as to which colours work best for Halloween projects as it is a time for massive decorating and anything looks fancier with some bling.  Have you noticed all the Halloween decorations for sale in the store?  Most of them have shiny or glittery surfaces, in all colours!  

None the less, I do love the Spiced Marmalade  and Paprika for a gorgeous pumpkin colour!  The Burgundy  makes blood look even bloodier.  The greens are just awesome to use for eyes on black cats.  And, the Blacks are great for cats, bats, and witches.  Oh but the list could go on and on...


I know I have shared this Layout project before, but here is a close up of one of the spider webs I made using a Little Yellow Bicycle chip board, Black acrylic paint by Ranger and of course Black Diamond Stickles as well as Rock Candy.


Again, here I used some Black Stickles, subtly on this Halloween card I made,  shiny black on yellow really stands out.


Here is a sample chart of just some of the effects you can get from using Stickles and colored pencils on Halloween themed stamp images. (Stamps from Halloween 2013 by Get Inky! stamps for Blue Moon Creation).

Go ahead and get creative, it's for Halloween after all and anything goes!
Thanks for stopping by.


Thursday, August 22, 2013

Ranger Thursday

Happy Thursday Stickles Fans!
 
 
Today is all about techniques/projects with Ranger products.  I was scouring YouTube looking for inspiration and ways to use Ranger projects.   


Tips for Distress Markers


Distress Paints


As some of you may know, I have been painting our main living room.  It has been quite a task....but I just keep thinking of all the wonderful decorations that I can make this year.   So, the next few videos are right up my alley. 


Quick and Easy Glitter Ornaments
(dry Stickles are perfect for this) 


Holiday Ornaments
(Many Stickles opportunities in this one)


I can't wait to try the ornaments with the kids this year.  So much fun and endless possibilities. 


Monday, August 19, 2013

Mixed Media Monday: Bird on a Branch


Hi All That Stickles fans, and welcome to another Mixed Media Monday.  It's me Ann from the Design Team here at ATS (and also from Annmakes).  I hope you have been enjoying this feature every Monday.  I certainly have been having fun.  Today I bring you my "Bird on a Branch" piece.  It is roughly a 12"x12" canvas wall hanging.  A sort of mini art quilt too.  The inspiration for this project came to me just outside my house. We live in the country where there are a lot of trees and an incredible variety of woodland birds.  So much so that our cat probably has anxiety issues from bird watching all day!    But back to my project.  The theme this week   at the ATS blog is all about Nature and the Outdoors, one of my favourites. Here is my inspiration:


I find Stickles work so well with this Nature/Outdoors theme because at just about any time of day and even night nature tends to reflect and show off little dashes of light.  Be it caused by the reflection of the sun on some dew drops, or the glistening of the moon on a white flower.  Ever noticed fireflies?  Animals in the dark with shiny eyes?  Pay attention next time you see a hummingbird, their feathers are quite shiny!

On this project I used Stickles as a final touch.  I especially like how the eye of the bird turned out with a drop of walnut stain.  That is a good colour for eyes, for sure.  I like the more subtle Distress stickles, Scattered straw on the branch too.  I used the Golden Rod on the bird for a yellow tinge, as well as some Walnut stain on its back.  The background has high lights with Eucalyptus and Waterfall.

I hope that this inspires you to try Stickles in your art work as well.  Go have fun now!

Thanks for viewing.


Supplies:
Raw canvas (Frederix)
Acrylic Paints:  Phthalo Green (Blue Shade), Hansa Yellow Light, Titanium White, Cerulean Blue Deep,  Cobalt Blue (Golden)
Bird Stamp (Magenta)
Music Notes Stamp (Michaels)
Ink: Black (Staz-On)
Gelatos: Brown, Silver, Lemon (Faber Castell)
Branches (my garden)
Large brass eyelets (Dollar store)
Shower curtain rings (Dollarama)
Batting (Fabricland)
Thread  (Coats)
Clear Gesso (Liquitex)
Heavy Gel Medium (Golden)
Glue (Weldbond)
Black pen (Sharpie)
Stickles used:  Golden Rod, Eucalyptus, Waterfall (Ranger)
Distress stickles:  Scattered straw, Walnut Stain. (Ranger)

**REMEMBER,  to check out the Linky Party.

Monday, August 12, 2013

Mixed Media Monday: Beauty is truth...


Hello, and welcome to our second Mixed Media Monday.  It's Ann here from Annmakes and the All that Stickles Design Team.  I have something to show and share with you today that I worked pretty hard at putting together but I also had a wonderful time doing so.

The Linky party "Anything Goes" runs until august 16 and so I went with that theme.


I did do just about anything on this piece.  It is a square 7"x7" canvas, recycled from a liquidation sale at a closing discount store.  It originally had some hideous design on it, but I saw its potential and altered it.

 There are many layers of texture and mediums, papers, plastics, wood, metal, clay, brass,jewelry, feathers, beads, and STICKLES (Diamond, and Copper).  It all started with my wanting to experiment at making gel prints with my new homemade gel plate.  I used a stack of card stock that was unsuitable for my stamp and ink work but faired well in this project.  I had scored a big box of leftover paints at a Church rummage sale earlier this summer and put it to use to make my own papers.  Once dry they were beautiful and I wanted to make flowers out of them.  I pulled out some EK success die punch makers that are perfect for cutting long borders that you roll into flowers.  I inked the edges of the flowers(with Vintage Photo Distress Ink from Ranger)  and added the stickles (Ranger) and some Goosebumps (Tsuikeneko).

 I got hooked on making the flowers but what to do with them?  That is when I got inspired to make this canvas.  The colours of the flowers inspired the rest of the colour scheme for the whole piece.  Obviously this week I am in the mood to use warm colours and so I went with that.  Lately I have been into working with dolls and faces and I wanted to incorporate that too, so in my digging through my hoarded stash of supplies and ephemera I found a mask, but it wasn't quite right, and altering it still wouldn't do, so I did the only thing I could.  I made my own clay doll face.

That's right not only did I experiment with home printing but I grabbed some clay and got messy. Boy, that was fun.  I love working with this natural clay, who would have thought?   While the stickles on the flowers were drying and the clay face was drying I worked on the canvas.  It has layers of texture and acrylic paint as a base, on to which I added more textures with a variety of materials: plastic fruit basket, dry wall tape, masking tape, plastic mesh, chip board die cuts, hand made paper trims, heavy gel medium and gesso.  I used some oil based paint and water based paints, mica glazes and walnut ink. I pushed and pulled, added here and there.  I glued on the face, flowers, feathers, the beads and other trinkets.  I added some faux gems and pearls to the flowers and I used my old Dymo label maker for the sentiment.

Sometimes I use those lovely Stickles by Ranger as the crowning touch on my work and then there are times when the Stickles are the inspiration for the beginning of my work.  I love that versatility.

I hope that you are inspired to get stickler, have fun!  Thanks for viewing.

Tuesday, July 2, 2013

Tips & Techniques Tuesday: Vintage Roses


Hello! Ann here from the Design Team. Today I have a nifty tutorial for you about making your own vintage roses with a dash of Stickles.

The great thing about this project is that all you need are coffee filters!  So you have more money left over to indulge your Stickles addiction. Ooops, I should have said: Passion.


So, to start you will need any type of round coffee filters, preferably new and unused, cause otherwise we are going for a grungy look, ha ha ha. Start by adding colour to the filters with either a spray dye wash or watered down water colour paints. Let it dry. Using any stamps that you want and any ink, (I used my Get Inky! stamps and Ranger Archival ink) stamp haphazardly over the coloured filters. Let dry.


Start cutting the filter in a spiral. 


Now using just your hands or a quilling tool tightly wrap the end of the cut spiral starting from the centre of the coffee filter.  Then, keep wrapping making each wrap looser at the top and pinching at the bottom.  Remember to use small dabs of glue at the base as you twist the paper.

Once you are done twirling and spiraling that paper into a rose shape use some double sided tape or more glue to adhere the end of the strip to the bottom of the rose.  Adjust the petals with your fingers by fluffing it here and there and pinching it some places.  (Yes, very technical isn't it?)


Using some ink (I like to used distress inks by Ranger), dab the edges of the rose. In this case I used Fired Brick and Rusty Hinge.

 
Squeeze some Stickles (I used  Distressed Stickles--Walnut Stain) onto your craft mat and very haphazardly dab the rose and even squish it face down while twisting on the craft mat.  Let it dry and adjust the flower's petals to your liking.
Add more stickles if desired.


Finally I used my favourite Distress Stickles: Rock Candy to add dew drops to my roses.  Now I have some lovely embellishments to add to any project I want.  Give it a try, it is easy and addictive.  Plus, if you use up all your coffe filters you might kick that coffee habit.  LOL.

I f you are looking for more ways to kick some nasty habits by replacing them with crafty goodness come check out my blog:  Annmakes. Also keep following our All that Stickles blog!

Thanks for viewing.

Thursday, June 13, 2013

Tips & Techniques Thursday: Embossing and Stickles

  
Hey ATS fans! Tonya here today with a great little tutorial using Stickles and an embossing folder to make a card background.   

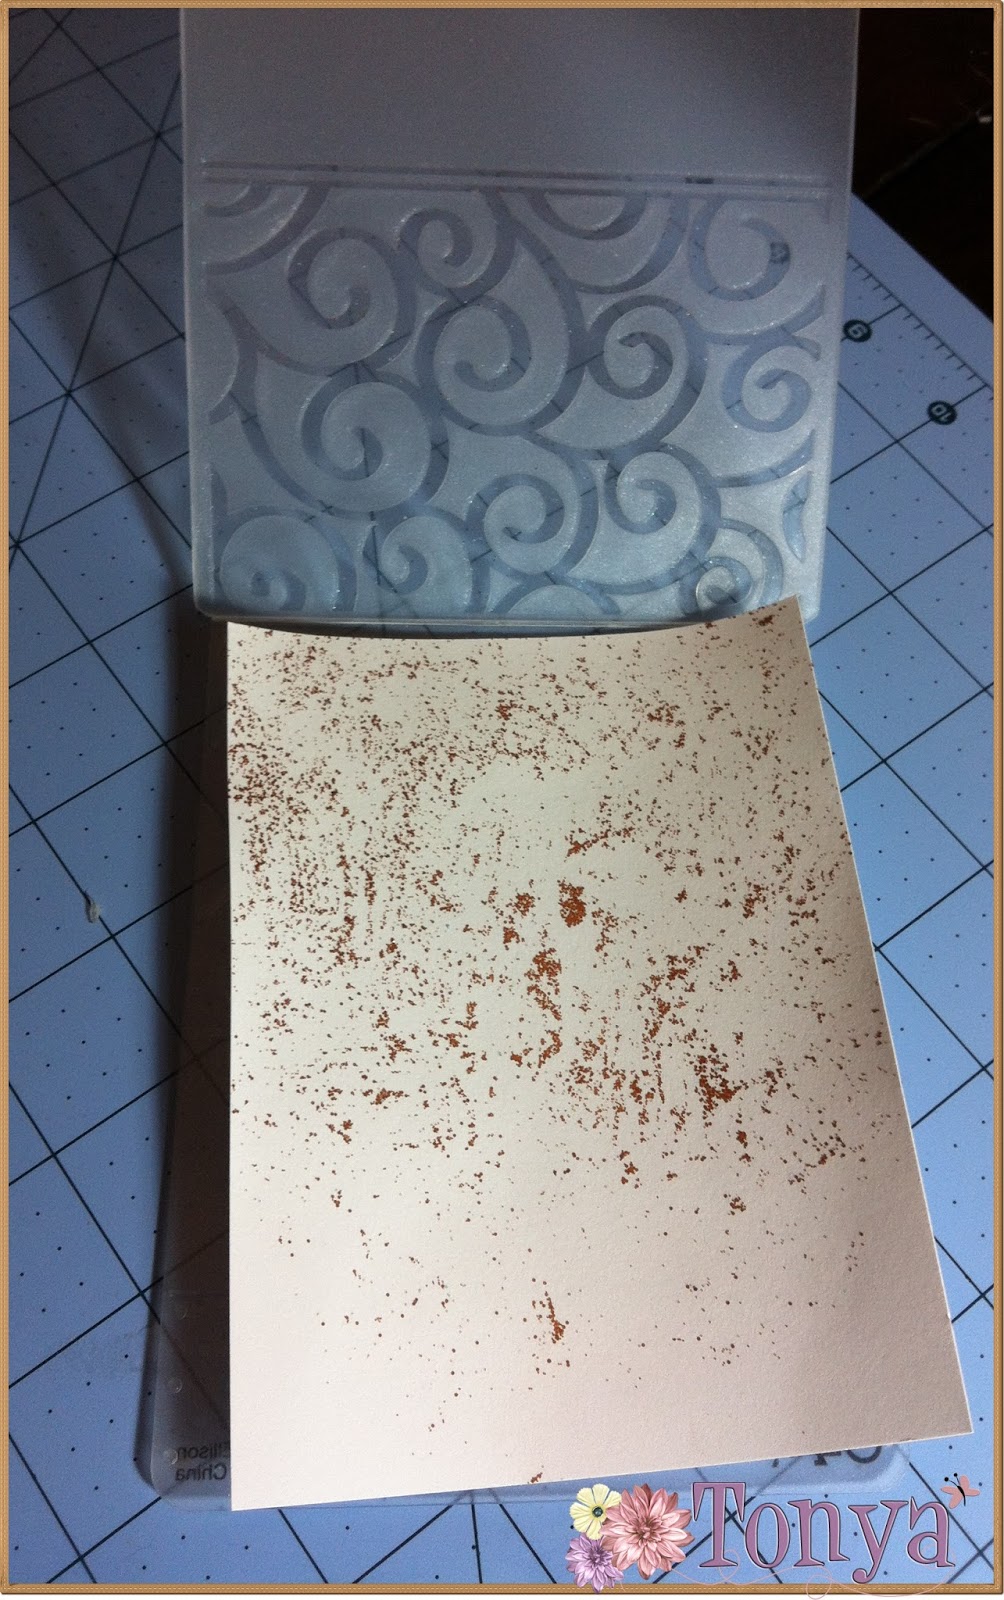
For this technique, the Stickles need to be dry. I started by painting a 4 1/4 x 5 1/2 piece of cardstock with Antique Bronze Distress Stickles. 


I let it dry about 4 hours. That seems like a long time, especially when you're anxious to see the finished result! :) But, letting the Stickles fully dry before continuing really does help.  

Once the Stickles were finally dry (stupid humidity!), I ran the cardstock through an embossing folder. 


(When doing this, make sure that the pattern will be raised on the same side of the paper the Stickles are on - the embossed side).


My plan for this background was to have the Stickles collected in the recessed areas of the embossed pattern.  To do this, I sanded the raised areas.


 The sanding may not sand off all the Stickles, but it will remove a large amount. 


Lastly, I inked the raised edges and swiss dots with fluid chalk to highlight the pattern and the Stickles.


My finished card......


Think I will be giving this card to my hubby for Father's Day. I love how Distress Stickles, even though they're glitter, can be used on masculine projects!  =)


Wednesday, June 5, 2013

Wednesday Inspiration

Happy Wednesday, Stickles Lovers!
 
I have a bit of Wednesday Inspiration to get those creative juices flowing.....then you can get your creations linked up to our Turquiose linky party. 
 
As you probably do, I use Stickles on just about every one of my creations.  This is no exception.  Stickles were added.  =) 
I created this little card box for my son's 4K teacher.  She has been wonderful and so understanding of his needs.  So I had to create something special for him to present to her at the end of the school year. 


I added Stickles to the center of the belly band and to the rings on the decorative paper. 


With all this creativity flowing from your screen, what are you going to create?


Thursday, May 23, 2013

Tips & Techniques Thursday: Creating Textures

Happy Thursday!!

Tonya here with a tutorial on Stickles and Textures. Now, I'm sure many of you weathered scrappers are familiar with many, if not all, of these techniques. That's ok. I'm a newbie to the scrapping world, and to Stickles in general. With that said, this tutorial is as much for me as it is for all of you.  =)

When coming up with an idea for this tutorial....I saw my son's door hanger...and thought...Eureka!!  That's it..........  Textures! 
I have used Stickles over the last several months to help create the illusion of texture, or play on light, or magic. 
The door hanger (pictured below) has the impression of waves, flowing waters, and sunlight. 


With this particular creation, I edged the 'waves' in lipstick red fluid chalk before applying the Waterfall Stickles.  It think it made the waves look more 3D....more dimensional.
  
Another texture I like for Stickles is sand.....


I like using a honey distress Stickles with a dark brown.  It gives the appearance of wet sand... just as the wave slips back out to sea. 

Here is a sample of Baby Blue Stickles to give the effect of a shiny balloon. 


Using Stickles to give this fairy's wings a magical feel:


This is a portion of a tag I created...I used yellow stickles to give the background a 3D feel. 

In order for this flourish to be more realistic, I used Green Stickles to create viens.  I think it makes them more realistic.   


This little fairy needs a pick me up....  I used yellow Stickles to accent the lines of her hair.  It gives her hair more texture.  The same with the wings.  Using the Stickles on the lines or shadows, makes the image come to life.  


Thank you for stopping by and humoring this newbie while I explored these techniques.  I enjoyed this part of the creative process. 


Wednesday, May 15, 2013

Wednesday, April 10, 2013

Wednesday Inspiration

Happy Wednesday! 
 
Tonya here with a mid-week inspiration for you Stickles Lovers. 
The digi is from The Stamping Chef.  I love her digis.  She has such a variety.  This one here is called Cool Becca.  I colored her with my copics and highlighted with Stickles, of course.  =) 
 
I went a bit Stickles crazy on this...but I think it worked.  There are Black Diamon Stickles on the border and the eyelet, Eucalyptus Stickles on the sweatshirt, True Blue Stickles on her jeans, and Yellow Stickles on her hair, banner, and the tag background. 

 
Supplies
Stickles - Yellow, Eucalyptus, True Blue, Black Diamond
Copics (for digi)
Distress Inks - Broken China, Crushed Olive
Fluid Chalk
Twine
 
Our Yellow Linky Party is live through April 12. Get your craft on, and then link up you creation.