Button photo DTC.png  photo DT.png Button Button Button Button Button
Button

Tuesday, August 13, 2013

Tips & Techniques Tuesday: Washi-Stickled Flower


Happy Tuesday, Stickle Lovers!  Karen N here from Craftily Yours, and today, I am super excited to show you a fun combination of washi tape and Stickles!

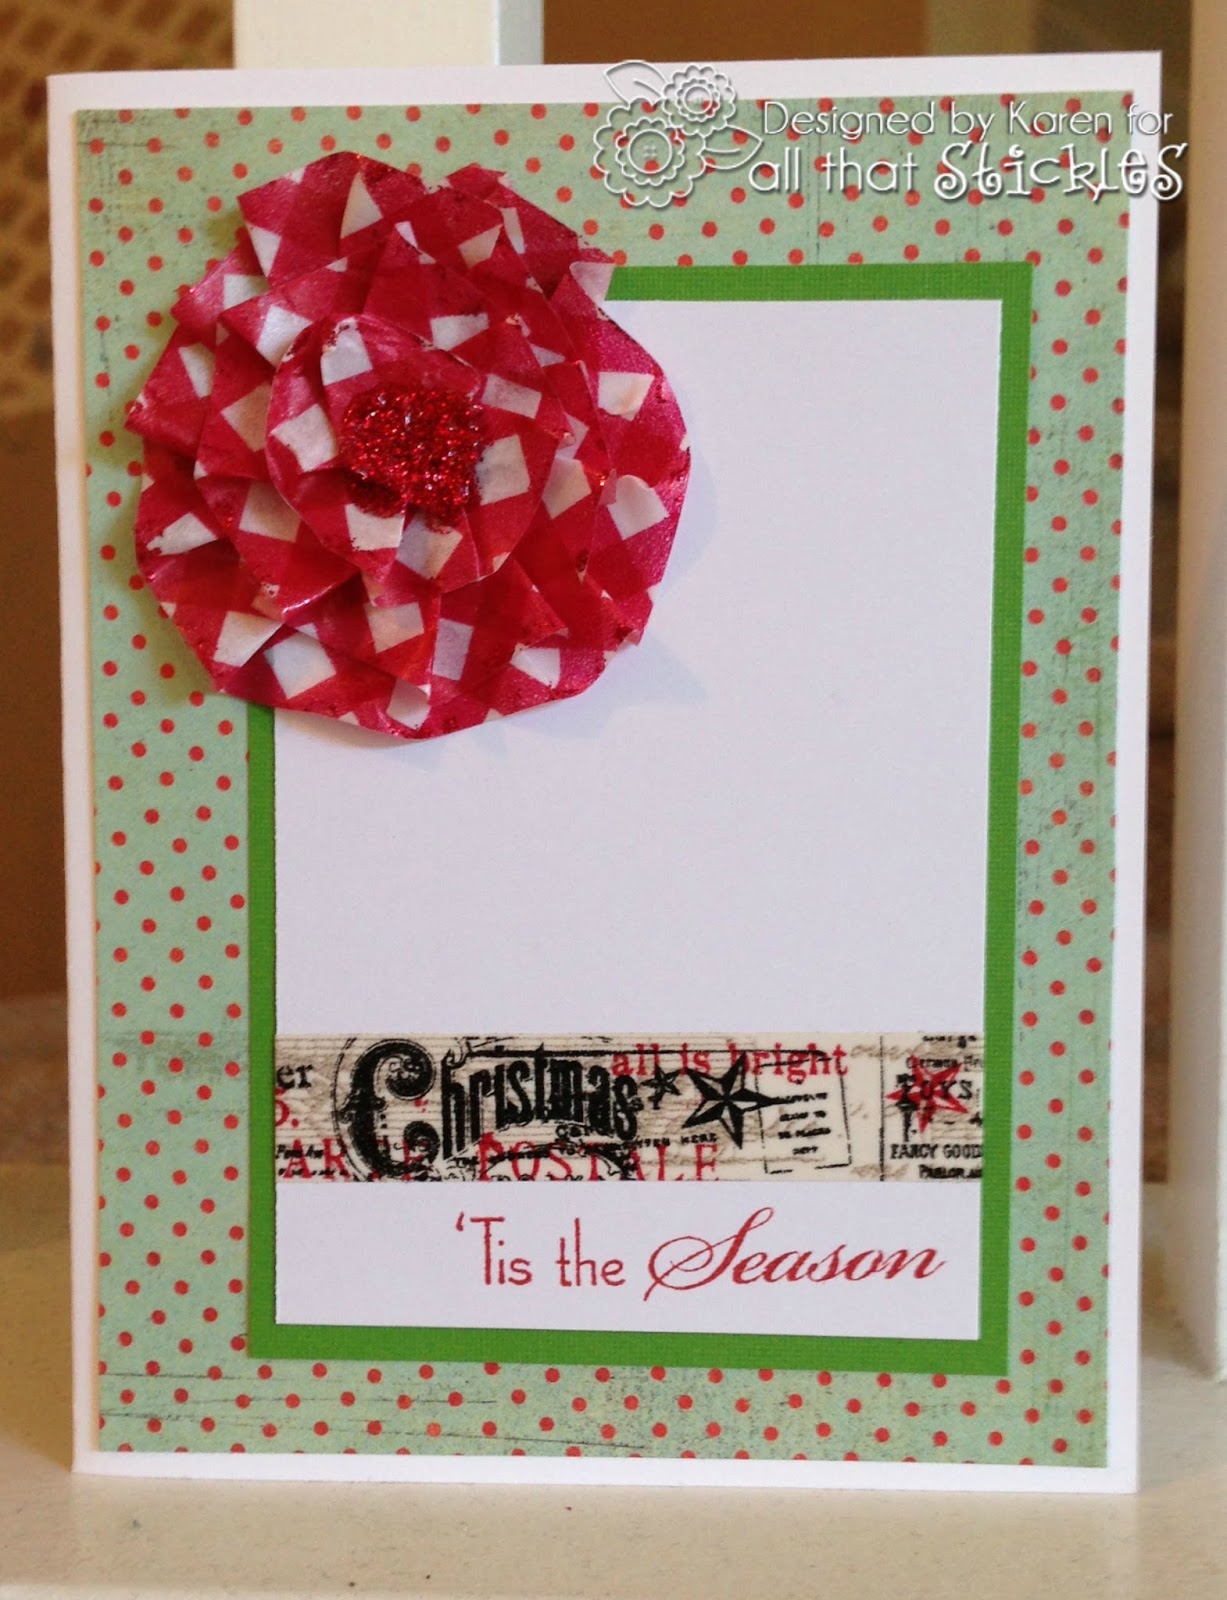
First, I started with a 1.5" circle and some washi tape.  I then wrapped and folded the washi around the circle.  When one row was done, I moved in a little and wrapped and folded some more.  Once I reached the inside, I just tore the washi tape off....and then fluffed up the edges a little.  The fabulous Tim Holtz has a video - HERE - if you are a video learner.


What Tim didn't do is to add some fabulous Stickles to adorn the flower!  I did!  I added a large glob in the middle and then used the tip that I dipped in the middle to lightly Stickle the edges.

When I was done and let it dry for quite a while, I have this cute, easy and sparkly flower...


I've been in a Christmas frame-of-mind for the last month or so, so I used my Xmas Red Stickle washi flower on a holiday card...


Don't ya just LOVE Christmas?! I know I do!

Craftily yours,

Karen


Monday, August 12, 2013

Mixed Media Monday: Beauty is truth...


Hello, and welcome to our second Mixed Media Monday.  It's Ann here from Annmakes and the All that Stickles Design Team.  I have something to show and share with you today that I worked pretty hard at putting together but I also had a wonderful time doing so.

The Linky party "Anything Goes" runs until august 16 and so I went with that theme.


I did do just about anything on this piece.  It is a square 7"x7" canvas, recycled from a liquidation sale at a closing discount store.  It originally had some hideous design on it, but I saw its potential and altered it.

 There are many layers of texture and mediums, papers, plastics, wood, metal, clay, brass,jewelry, feathers, beads, and STICKLES (Diamond, and Copper).  It all started with my wanting to experiment at making gel prints with my new homemade gel plate.  I used a stack of card stock that was unsuitable for my stamp and ink work but faired well in this project.  I had scored a big box of leftover paints at a Church rummage sale earlier this summer and put it to use to make my own papers.  Once dry they were beautiful and I wanted to make flowers out of them.  I pulled out some EK success die punch makers that are perfect for cutting long borders that you roll into flowers.  I inked the edges of the flowers(with Vintage Photo Distress Ink from Ranger)  and added the stickles (Ranger) and some Goosebumps (Tsuikeneko).

 I got hooked on making the flowers but what to do with them?  That is when I got inspired to make this canvas.  The colours of the flowers inspired the rest of the colour scheme for the whole piece.  Obviously this week I am in the mood to use warm colours and so I went with that.  Lately I have been into working with dolls and faces and I wanted to incorporate that too, so in my digging through my hoarded stash of supplies and ephemera I found a mask, but it wasn't quite right, and altering it still wouldn't do, so I did the only thing I could.  I made my own clay doll face.

That's right not only did I experiment with home printing but I grabbed some clay and got messy. Boy, that was fun.  I love working with this natural clay, who would have thought?   While the stickles on the flowers were drying and the clay face was drying I worked on the canvas.  It has layers of texture and acrylic paint as a base, on to which I added more textures with a variety of materials: plastic fruit basket, dry wall tape, masking tape, plastic mesh, chip board die cuts, hand made paper trims, heavy gel medium and gesso.  I used some oil based paint and water based paints, mica glazes and walnut ink. I pushed and pulled, added here and there.  I glued on the face, flowers, feathers, the beads and other trinkets.  I added some faux gems and pearls to the flowers and I used my old Dymo label maker for the sentiment.

Sometimes I use those lovely Stickles by Ranger as the crowning touch on my work and then there are times when the Stickles are the inspiration for the beginning of my work.  I love that versatility.

I hope that you are inspired to get stickler, have fun!  Thanks for viewing.

Tuesday, August 6, 2013

Tips & Techniques Tuesday: Stickled Waves


It's Tuesday!  Good news for "TUE" reasons!  First, it's not Monday!  And second, it's time for a Tips and Techniques! Karen here from Craftily Yours, and I am super excited to show you how to use some of those gorgeous Stickles to make waves! 

First, I cut a card mat (with a circle in the middle) and a smaller mat to go behind it.


I used Timeless Twine in light blue and glued one piece across the mat using my glue.  Of course, I made it wavy.  Then I laid a strip of True Blue Stickles just below the first piece and laid another strip of twine down.  Remember, Stickles isn't just glittery goodness, it's glittery GLUE!
 

I kept putting down Stickles and layering up the twine until I got enough twine down to fill the hole in my mat.  I alternated using Stickles in True Blue, Waterfall, and Turquoise to add some dimension.  When I was done, I put a little extra Stickles on top just to make sure it was good and sparkly - like the water at the ocean!
 

It's ok if there are some spaces because you can just fill 'em in with more Stickles!  Once it dried, I trimmed the edges and used it to make this cute birthday card!  The boat is a cut from the Cameo store that I colored in with copic markers and TH distress ink.....and I added some sky with distress as well.

I added some Christmas Red Stickles to the flag and embellished it with a little Snug Hug ribbon and a nautical brad!

I really love how the card turned out!  It looks like it took a long time, but the whole card took me about 20 minutes!

Hope I've inspired you to make some waves!

Craftily yours,

Karen


Monday, August 5, 2013

Mixed Media Monday is here!


Hello and Happy Monday to everyone!  It's me Ann from the All that Stickles Design Team and also from Annmakes.  I am so excited to be doing this new feature about Mixed Media.  The idea is that each week I will present a Mixed Media piece of my own creation with the theme of the Linky Party going on.  Now the Linky parties run for two weeks at a time and our Design Team creates some really beautiful and fun samples to inspire your own creations that you can link up to the blog and have the chance to win some prizes from our ever so nice and generous sponsors for that month.  Remember, keep the theme in mind and most importantly:  STICKLE away!  We love to use those shimmery little bottles of greatness and we hope you do too!


So here goes, my creation this week: 


A two page spread in one of my Art Journals, "Options".  As you may already know Art journals are about anything you want them to be.  Mine are especially random and eclectic.  This journal is the one I keep around in my studio and take with me to classes and crops.  I use it to clean my paint brushes and other tools.  Really.  It is a way for me to create backgrounds in advance.  Then later when ever I have the need to make something, express some sort of feeling or just try out a new technique I can pull out this journal and already have a page or two that are not blank.  Artists and crafters are often scared of that blank page or canvas, so having some mark already made can be the catalyst to something unexpected and creative.  

The journal is a Canson XL Series Mix Media, 98 LB, 7x10".  The pages had a splattering of mossy green and smokey blue acrylics(probably a combination of Liquitex basics and Dollar store)  to begin.  the pages had stuck together in some places and when opened the pages tore a bit which gave it that texture that is hard to see in this photograph.  I used white gesso (Omer deSerres)  and some homemade stencils for more texture and to brighten up the pages.  The figure was made from the outline of a Prima Doll stamp and Black India ink (Pemco)  that I brushed on.  I used fine and extra fine tip black pens and markers (Staedler, Staples, Bic, Copic), some white chalk pastel (Galleria), charcoal coloured conte, rub ons (Dollarama and Staples), recycled tags, oil pastels, water soluble oil pastels (Binney & Smith), shimmery mica and ink sprays, extra heavy duty clear gel (Liquitex) to adhere the sparkly bead trims (recycled from old upholstery), Aleene's tacky glue, Distress inks by Ranger and STICKLES! (Blueberry Ice stickles, Rock Candy Distress stickles, and Gunmetal stickles).

In my work I use tools that range from high end expensive to downright cheap and cheerful.  Very good tools are worth investing in and cheaper tools that will get easily ruined should be cheap as long as they do the job, that's just my opinion.

Don't forget to head on over to the Linky Party and challenge yourself, right now the theme is "Anything Goes".  Have fun.  I hope you enjoyed this and thanks for viewing. :)

Saturday, August 3, 2013

New Linky Party + July Winners + New DT = One Big Post!

Hey, Stickles fans! We have a rather large post for you today, but we promise it's full of super exciting information!

We think it's fun to change things up every once in a while, and we've got some brand new, exciting changes happening at ATS starting THIS month!

What are those changes, you ask?
  • Before, our linky parties were geared towards using a certain color of Stickles. Now, instead of specifying colors, we're giving you themes and you can create any project using any Stickles as long as the project follows the theme. 
  • We have a brand new, Mixed Media Monday feature coming to the blog! Every Monday, DT member and mixed media artist, Ann, will be sharing with you different mixed media projects made using Stickles! Check back this Monday, August 5th, for the first post!
  • Starting in September, we will also be hosting "Featured Fan Fridays" every Friday! Guest designers will get to share their Stickled projects with us and even get to participate in our blog hops. If you're interested, check out the "Want to be featured?" page, right here on the blog!

Phew! Ready for the next segment? Let's say hello to our brand new, design team members! Their info can also always be found on our Design Team page. Make sure to stop by their blogs and say hi!


Graphic Designer
Hi, I am a SAHM living in in Homestead, Florida with my husband, my son, a long hair Chihuahua and a cat that adopted us 6 months ago. I have been scrapbooking all my life and card making for almost 7 years now. I still don't know what my style my cards are, but I incline to bright colors and cartoonish images and design them myself. My motto "less is more," even though at the end I may have added some bulky stuff too! I am very honored and proud to be on this wonderful design team!

"Hi! I am Angeline. I only started my obsession over all things scrappy 1 1/2 years ago when I first bought my first starter kit from a Groupon deal. From then on, it never stopped! I love to create and I make cards, mini albums, art journals, altered projects... scrappy makes me happy! :) And what girl doesn't like bling? Stickles is just the perfect way to add the extra needed touch to your scrappy project. I am glad to be on this team and can't wait to show you amazing things you can do with Stickles."

"Hi, I'm Cathie. I am 45 years old, and a mom of 2 . My son is 21 and my daughter is 16, I've been married for 23 years. I live in San Diego but am originally from Philly. I have been crafting for 25 years now and my love is paper crafting. I love that I can take a few pieces of paper and make a lasting memory scrapbook page or a handmade card to make someone smile. I love to be able to share my projects and ideas while trying new things as well. I'm always up for a challenge and some bling!"

"I live in Wisconsin and have two grown children; Jaci and Josh. Making cards, crafting, and reading is what I enjoy doing whenever I can! I'm also addicted to Pinterest...and love it. I have fun blogging and started my blog in December 2012! I am a craft supply junkie and a hoarder of some... especially paper. My style could be called eclectic and I often use some type of distressing in my cards. My favorite stamps are from Crackerbox Palace Rubber Stamps and Tim Holtz. I love Stickles and am so glad I have this opportunity!"


"Hi My name is Laura Davidson. I live in Strathroy Ontario Canada. I am a single Mom to 3 grown children and Nanny to 5 grandchildren. I work full time as a nurse in a nursing home. I love to scrapbook and make cards..  I absolutely LOVE Stickles. It is one of my favorite go to items when crafting. I love to learn new techniques and will try anything once. I am so happy to be part of this design team."

We're super excited to have all of these wonderfully talented ladies on our design team! Let's announce our July winners, and see what our new Stickles gals have created for you as inspiration for our linky party!


Variety Pack of Dew Drops
WINNER: NANA CONNIE

$15 Gift Certificate
WINNER: YVONNE

5 Digis of Winner's Choice
WINNER: LENE

1 Stamp Set of Winner's Choice
WINNER: KATHY SALIDO

Winners should email us at allthatstickles@gmail.com with subject line "JULY WINNER" to claim their prizes!

And finally, welcome to this week's linky party at All that Stickles!

And don't forget about the prizes! Every month we will have multiple sponsors and multiple winners! Winners are not announced on a weekly basis, but rather on a monthly basis. The more times you link up, the more chances you have to win! Sponsors will be announced at the beginning of the month and then posted on the sidebar for the rest of the month, and the winners will be announced on the first Saturday of the next month.

Linky Party Rules & Guidelines
  • Anything Goes linky party is open from Saturday August 3rd - Friday August 16th at 11:00 PM US CST
  • Any project you submit must be linked to your blog or online gallery.
  • Projects must be NEW, no backlinking, please.
  • Number of entries per linky party is unlimited.
  • You may link up ANY type of crafty project as long as it follows our theme
  • You may use as many colors of Stickles as you'd like on your projects
  • Winners will be randomly chosen.

This week's linky party theme is anything goes! Create ANY project using ANY color and ANY type of Stickles!


And without further ado, here's some inspiration from the design team to get those glittery gears turning!

Stickles Used: Lime Ice & Gold Ice


Stickles Used: Silver, Yellow, Xmas Red

Stickles Used: Magenta, True Blue, Orange Peel, Glam Pink, Yellow, Firefly

Stickles Used: Firefly, Xmas Red, Star Dust


Stickles Used: Frosted Lace

Stickles Used: Lime Green, Goldren Rod, Crystal


Stickles Used: Diamond

We can't wait to see what you create! Thanks for linking up!

Tuesday, July 30, 2013

Tuesday Tips and Technique: Shrinky Dink bracelet

Hi Stickle fans!!!  Chas here and like I promised during the Surf, Sun and Stickle blog hop, here I am to show you how I made the shrinky dink bracelet.

Since it was a summer blog hop, I know right away that I wanted to use my Life's a Beach cricut cartridge. Luckily for me that cartridge had a charm setting on it so that was perfect for my bracelet.

I used the two inch size for my charms.


The plastic cut like butter as long as the mat was sticky.  No problems what's so ever.

After I had my shapes cut out, I used my permanent makers to color them, actually my daughter did the coloring.  I tried to use the stampin up ink markers but it rubbed off the plastic.  I'm not sure if copic would work since I don't have any.  One thing to remember is the color will be a lot darker once the plastic is shrunk down.


I tried putting stickles on first but that did not work out. Plus you use a lot more of the stickles before you shrink compared to after.

One of the main things to remember if you are making necklaces or bracelets.  Make sure you use a hole punch before you shrink it.

I used my heat gun.  It only took a few seconds to shrink it down.  But be careful of your fingers.  I used a paper clip to hold the plastic in place.


Here is the after picture.


See how much darker the color is on the charm.

Next is the fun part.  But shrinking was really fun but hey this is a stickle blog.  :)  I used golden rod for the outside of my charm.


After it's all dry, just get out your favorite beads and make that piece of jewelry that you want.  One think that I did not think of when I was making my bracelet, was to use jump rings for the charms.  They would not lay flat like I wanted to.  But I think the bracelet turned out really good for the first time.


 My daughter and her friends are making a My Little Pony bracelet for when we go to Bronycon this weekend.  Check out my blog  Scrapin Lizards,  to see their creations.


Saturday, July 27, 2013

Waterfall Linky Party Inspiration


Happy Saturday, Stickles fans! Today the design team would like to share with you some mid-challenge inspiration for our current Waterfall Linky Party!


All you have to do is create a project using Waterfall Stickles! The linky party ends next Friday, August 2nd. Remember that our list of sponsors for the month can always be found on the sidebar of our blog. :)

And now here's what a couple of our DT members 
have created for you!

Stickles Used: Waterfall & Tattered Rose

Stickles Used: Waterfall & Cotton Candy
Paper from The Robin's Nest

Aren't their projects fabulous?!

Hope to see you linking up! :)