Button photo DTC.png  photo DT.png Button Button Button Button Button
Button

Saturday, March 30, 2013

Yellow Linky Party!

Welcome to this week's linky party at All that Stickles!  

We're changing things up! Our linky parties are now going to be every other week instead of every week to give you more time to create and share your wonderful, Stickled projects.

And don't forget about the prizes! Every month we will have multiple sponsors and multiple winners! Winners are not announced on a weekly basis, but rather on a monthly basis. The more times you link up, the more chances you have to win! Sponsors will be announced at the beginning of the month and then posted on the sidebar for the rest of the month, and the winners will be announced on the first Saturday of the next month. So March winners will be announced on Saturday April 6th.

Linky Party Rules & Guidelines
  • Yellow linky party is open from Sat. March 30th - Friday April 12th at 11:00 PM US CST
  • Any project you submit must be linked to your blog or online gallery.
  • Projects must be NEW, no backlinking, please.
  • Number of entries per linky party is unlimited.
  • You may link up ANY type of crafty project as long as it uses the Stickles color of the week.
  • Projects not using the Stickles color of the week will be disqualified.
  • You may use as many colors of Stickles as you'd like on your projects as long as the color of the week is included.
  • Winners will be randomly chosen.
Winners of our March linky parties will be announced on Saturday April 6th. Our March sponsors are listed on the sidebar of our blog. :)

This week's linky party color is Yellow!

Create ANY project using Yellow Stickles!


And without further ado, here's some inspiration from the design team to get those glittery gears turning!

Stickles Used: Yellow

Stickles Used: Yellow & Patina
Fairy with Flower Umbrella Digital Stamp from The Paper Nest Dolls

Stickles Used: Yellow
Butterfly Chick Digital Stamp from Fresh Brewed Designs

Stickles Used: Yellow, Star Dust, Orange Peel, Waterfall
Butterfly Chick Digital Stamp from Fresh Brewed Designs

Stickles Used: Yellow

We can't wait to see what you create! Thanks for linking up!

Thursday, March 28, 2013

Tips & Techniques Thursday: Stickles & Paper Tape

Good morning, Stickle-lovers! Today we are welcome our second featured guest blogger, Agnes, aka flowerdisco!

HELLO everyone, 
This is Agnes, aka flowerdisco, in this web of crafters and I am so excited Ashley invited me to share with you a what I sometimes do with my Stickles.

I make patterns with my stickles on a piece of tape (paper tape, masking tape, fabric tape) any of these will work. Stickles rock! And they adhere to anything i have tried them on, :)

First, a peek at my project!


When I started experimenting this is what I did:
  (Turquoise, Yellow and Candy Cane Stickles were used on these samples)

 You can see the first one is paper tape andIi found this roll in the floral department, the second tape is just old and plain regular masking tape from the dollar store and the last is the fabric tape I found in the first aid section of a drugstore/department store.

I also textured them: the first two were textured using a comb and the last one using a pencil eraser top. I also use the stickles bottle tip sometimes, but my favorite texture so far is the one I make with the eraser top.

---I like the mountains and valleys look--- check out this orange strip (Orange Peel Stickles)
Cool, huh?

Here is a card I made using my favorite texture, I hope you like it and try the technique-
(I used the paper tape)

...You can try anything if you ask me... Sending You SMILES Across the Miles 5" x 7" card

I also added some stickles (Frosted Lace) to the clouds---kind of zig zagged it and I added some tiny dots to to the patterned paper too (on the brown stars-like).

I added some more dots (a bit bigger) on this hot balloon die cut. these dots were done with Candy Cane Stickles.
 

Other details from my card: the dots are from a rub-on and a pretty sentiment was stamped. The heart is a punched element and was covered with Glossy Accents. The small round tag it is also another die cut. some sewing machine stitching and some cotton twine finish the details. The colorful papers are from the Echo Park "Scoot" collection -- so pretty! I hope you try it and, again thank you so much for visiting All that Stickles and thank you to Ashley for having me as a guest blogger today.

Bye now and take care!
Blogged by Agnes from Flowerdisco's Scrap Hut.

Tuesday, March 26, 2013

Tips & Techniques Tuesday: Unclogging Stickles Bottles

We all love using our Stickles, but sometimes a bottle is clogged. That is very frustrating. Here is something you can try:

You will need a long needle or pin and scrap paper.


First try shaking the bottle to loosen or move the glitter.


If that doesn't work, stick the needle (or pin) very far into the bottle.  You need to push it in far to move any of the glitter that is stuck in the nozzle.


Remove the needle (or pin).  


After the procedure, test the bottle on scrap paper.  It will splatter and be inconsistent at first.  Once all the bubbles are out, it should work normally.


If this doesn't work AND it's a brand new bottle, contact the company you bought it from.  They will usually replace the bottle.  If it's an old bottle that won't unclog, that is a great reason to 'have' to buy a new one.

Thursday, March 21, 2013

Tips & Techniques Thursday: Painting with Stickles

Hey ATS fans! Today we'd like to welcome our FIRST guest blogger, Julie from Muddy Paws & Inky Fingers! You'll be sure to want to stop by her blog because she is having a STICKLES GIVEAWAY! Please give her a warm welcome as she shares a super fun tutorial with us, we hope you love it as much as we do! I know I'll be giving it a try in the future. :)

It's a sunshiny day no matter what the weather is!  I'm excited to be here and share with you one of the ways I like to use Stickles.  A huge thank you to Ashley and the All That Stickles design team for inviting me today!

Now, on to my project.  I have lots of Stickles in my possession, but sometimes I want to spread them on a large surface that looks globby with the applicator tip or I'm not as neat with the applicator as I would like.  That's when I turn to my rescue tool!  Follow along with this tutorial and you'll see what I mean!

I'll show you the finished product first, then walk you through how I got there.


Now, isn't that an adorable little bird? It won't quit snowing here in Wisconsin so I was tempted to make a snowman instead but that didn't seem very spring-like, so I went with this cute litte guy. I'll show you my process for making him. The stamp I used is a Unity Itty Bitty stamp called "Dance in the Rain." 

First, I stamped his boots on My Mind's Eye Quite Contrary Jack & Jill 6x6 designer paper. Then, I fussy cut them.

I did the same thing with the umbrella.  I only inked up the portion of the stamp I needed, then fussy cut that, too.

Here's what you need to paint on the Stickles  -- a fine mist bottle, a small paint brush, and your Stickles.  I used Lime Green and Icicle Stickles.


I mixed a small amount of water in with the Lime Green Stickles until I got a consistency that made it easy to paint, then applied it to the whole surface of the umbrella. That paint brush is the rescue tool I mentioned earlier. LOVE my paint brush!


I didn't have the angle quite right to get good sparkle, but you get the idea.  I'm using a craft mat to mix and paint on.

I used a slightly different technique for the boots. Because they are smaller, and I was afraid red Stickles might cover up the stamped pattern, I went with Icicle Stickles and mixed in a little red watercolor paint with them. The look is more subtle.


I love Stickles. I find glitter very messy, so whenever I want a little extra bling, it's Stickles that I reach for. I often paint them on when the surface is large enough to accommodate. Give it a try!

I'll leave you with a close up of the glammed up bird, wishing you a Happy Easter!


Please stop by my blog, http://muddypawsinkyfingers.blogspot.com for more of my work. I would love to have you visit!

~Julie

Wednesday, March 20, 2013

Rainbow Blog Hop Winners!

Thanks so much to everyone who participated in our Rainbow Blog Hop! We hope you found some fun and of course glittery inspiration for any upcoming spring projects you may be working on. :)


Here are the winners from our hop!

$30 Gift Certificate
WINNER: KATHY S.

$6 Gift Certificate
WINNER: SILVIA

$25 Gift Certificate
WINNER: KATHY SALIDO

10 Digis of Winner's Choice
WINNER: VICKI

Winners should email us at allthatstickles@gmail.com to claim their prizes.

Have a great day!

Tuesday, March 19, 2013

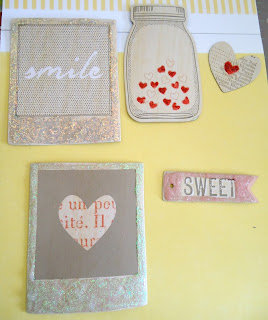
Tips & Techniques Tuesday: Adding Stickles To Your Chipboard Pieces !


Hello to all my crafty Stickles peeps!!
 This is Cynthia .
 Today I will be showing you a technique on how to add Stickles to some chipboard pieces 
and use them to make some 
Project Life tags.

First off you start with your choice of pieces to Stickle. 
For this project I used some 
American Crafts printed chipboard images,
which are shown below.


The Stickles that I used for this project were 
X-mas Red, Cotton Candy, Icicle and Crystal.


Once my colors were chosen I went ahead and started the technique.
  I applied the Stickles where I wanted so it could make the chipboard stand out a lot more.


This is how that turned out. 
What a big Difference Stickles make right? :) 
 Once that is done all you have to do and wait for it to dry.
Remember it will be quite a while for it to dry just be patient.

While that is drying I picked my 
tags from my Clementine Core Kit.


These are the tags I will be using and will be adding my chipboard Stickled pieces to .

These are the finished Project Life Tags :)


Thank you for stopping by to check out my technique! 
- Cynthia 

Don't forget you still have plenty of time to get your crafty things posted for our Lime Green Linky party :)

Sunday, March 17, 2013

Rainbow Blog Hop

Happy St. Patrick's Day and welcome to the Rainbow Blog Hop brought to you by the All that Stickles design team!


Today we've put together a fun and of sparkly blog hop full of rainbow-themed projects! Whether the projects contain actual rainbows or just a rainbow color scheme is up to each DT member, but either way these colorful projects are sure to inspire you!

If you're looking to start at the beginning of the hop, you're in the right place!

We have blog candy for those who are a follower of All that Stickles and leave a comment on every stop of the hop! Winners will be announced Wednesday March 20th at All that Stickles.

$30 Gift Certificate

$6 Gift Certificate

$25 Gift Certificate

10 Digis of Winner's Choice

Your next stop is Ashley's blog.

Here's the complete lineup:

Thanks for hopping! :)

Saturday, March 16, 2013

Lime Green Linky Party

Welcome to this week's linky party at All that Stickles!  

We're changing things up! Our linky parties are now going to be every other week instead of every week to give you more time to create and share your wonderful, Stickled projects.

And don't forget about the prizes! Every month we will have multiple sponsors and multiple winners! Winners are not announced on a weekly basis, but rather on a monthly basis. The more times you link up, the more chances you have to win! Sponsors will be announced at the beginning of the month and then posted on the sidebar for the rest of the month, and the winners will be announced on the first Saturday of the next month. So March winners will be announced on Saturday April 6th.

Linky Party Rules & Guidelines
  • Lime Green linky party is open from Sat. March 16th - Friday March 29th at 11:00 PM US CST
  • Any project you submit must be linked to your blog or online gallery.
  • Projects must be NEW, no backlinking, please.
  • Number of entries per linky party is unlimited.
  • You may link up ANY type of crafty project as long as it uses the Stickles color of the week.
  • Projects not using the Stickles color of the week will be disqualified.
  • You may use as many colors of Stickles as you'd like on your projects as long as the color of the week is included.
  • Winners will be randomly chosen.
Winners of our March linky parties will be announced on Saturday April 6th. Our March sponsors are listed on the sidebar of our blog. :)

This week's linky party color is Lime Green!

Create ANY project using Lime Green Stickles!


And without further ado, here's some inspiration from the design team to get those glittery gears turning!

Stickles Used: Lime Green

Stickles Used: Lime Green

Stickles Used: Lime Green

Stickles Used: Lime Green
Lucky Pup Image from Fresh Brewed Designs

Stickles Used: Lime Green, Pink
Heart Hot Air Balloon Image from Fresh Brewed Designs

Stickles Used: Lime Green
Rainy Day Image from The Paper Nest Dolls

We can't wait to see what you create! Thanks for linking up!